Difference between revisions of "Dungeoneering"
(→Entering Maps) |
(→Relic Affixes) |
||
| (240 intermediate revisions by 5 users not shown) | |||
| Line 2: | Line 2: | ||
| − | == | + | == What is a Relic == |
| − | + | A relic is an item that drops in Hell difficulty, which can be used to open a portal to a new area with challenging monsters. These relics can have affixes which makes the monsters stronger or the player weaker in exchange for an increase in XP earned. | |
| + | Relics are consumed when the portal is opened. Once inside the area, players can mouse-over the relic icon on the hotbar to see the active affixes. | ||
| − | + | == How to use a Relic == | |
| − | + | Characters must be level 80 and have completed the ''Rite of Passage'' quest in Act V. | |
| − | |||
| − | |||
| + | In Harrogath, next to Malah, you will find an Altar that can be clicked. Place an identified Relic inside and click the button to consume the relic and open a portal. | ||
| − | + | Only one portal can be opened at a time. To open a second portal, simply create a new game. | |
| − | + | == Relics == | |
| − | + | Relics are grouped into difficulties based on the icon's colour. | |
| − | + | Relic icons that are: | |
| − | + | * white should be slightly challenging for a single player | |
| + | * yellow should be a moderate challenge for a few players | ||
| + | |||
| + | * red should be a difficult challenge for a full party. | ||
| − | + | Relics may have a few variety of layouts or have the same static layout each time. | |
| − | |||
| − | |||
| − | |||
| − | |||
| − | |||
| − | |||
| − | |||
| − | |||
| − | |||
| − | + | ''Relic orientation may be rotated compared to the layouts presented.'' | |
| − | White | + | '''White Relics''' |
| − | |||
| − | |||
| − | |||
| − | |||
| − | |||
| − | |||
{| class="wikitable" | {| class="wikitable" | ||
|- | |- | ||
!colspan="1"|Name | !colspan="1"|Name | ||
| − | !colspan="1"| | + | !colspan="1"|Area Level |
!colspan="1"|Boss | !colspan="1"|Boss | ||
!colspan="1"|Layouts | !colspan="1"|Layouts | ||
|- | |- | ||
! style="vertical-align:top;text-align:left"| | ! style="vertical-align:top;text-align:left"| | ||
| − | Icy | + | Icy Cavern |
! style="vertical-align:top;text-align:left"| | ! style="vertical-align:top;text-align:left"| | ||
86 | 86 | ||
| Line 65: | Line 53: | ||
86 | 86 | ||
! style="vertical-align:top;text-align:left"| | ! style="vertical-align:top;text-align:left"| | ||
| − | + | Blood Huntress | |
! style="vertical-align:top;text-align:left"| | ! style="vertical-align:top;text-align:left"| | ||
| − | [ | + | [[Media:T2_1.png | Layout 1]], |
| − | [ | + | [[Media:T2_2.png | Layout 2]] |
|} | |} | ||
| − | + | '''Yellow Relics''' | |
{| class="wikitable" | {| class="wikitable" | ||
|- | |- | ||
!colspan="1"|Name | !colspan="1"|Name | ||
| − | !colspan="1"| | + | !colspan="1"|Area Level |
!colspan="1"|Boss | !colspan="1"|Boss | ||
!colspan="1"|Layouts | !colspan="1"|Layouts | ||
|- | |- | ||
! style="vertical-align:top;text-align:left"| | ! style="vertical-align:top;text-align:left"| | ||
| − | + | Desecrated Temple | |
! style="vertical-align:top;text-align:left"| | ! style="vertical-align:top;text-align:left"| | ||
87 | 87 | ||
! style="vertical-align:top;text-align:left"| | ! style="vertical-align:top;text-align:left"| | ||
| − | + | - | |
! style="vertical-align:top;text-align:left"| | ! style="vertical-align:top;text-align:left"| | ||
N/a | N/a | ||
| Line 93: | Line 81: | ||
87 | 87 | ||
! style="vertical-align:top;text-align:left"| | ! style="vertical-align:top;text-align:left"| | ||
| − | Root of All Evil | + | Root of All Evil, also Blood Huntress sometimes |
! style="vertical-align:top;text-align:left"| | ! style="vertical-align:top;text-align:left"| | ||
N/a | N/a | ||
|- | |- | ||
! style="vertical-align:top;text-align:left"| | ! style="vertical-align:top;text-align:left"| | ||
| − | + | Musty Crypt | |
| + | ! style="vertical-align:top;text-align:left"| | ||
| + | 87 | ||
| + | ! style="vertical-align:top;text-align:left"| | ||
| + | - | ||
| + | ! style="vertical-align:top;text-align:left"| | ||
| + | [https://imgur.com/7EdFSYP Layout 1], | ||
| + | [https://imgur.com/nKvfyyN Layout 2] | ||
| + | |- | ||
| + | ! style="vertical-align:top;text-align:left"| | ||
| + | Decomposing Settlement | ||
! style="vertical-align:top;text-align:left"| | ! style="vertical-align:top;text-align:left"| | ||
87 | 87 | ||
! style="vertical-align:top;text-align:left"| | ! style="vertical-align:top;text-align:left"| | ||
| − | + | Lord Balthazar | |
! style="vertical-align:top;text-align:left"| | ! style="vertical-align:top;text-align:left"| | ||
N/a | N/a | ||
| Line 108: | Line 106: | ||
|} | |} | ||
| − | + | '''Red Relics''' | |
{| class="wikitable" | {| class="wikitable" | ||
|- | |- | ||
!colspan="1"|Name | !colspan="1"|Name | ||
| − | !colspan="1"| | + | !colspan="1"|Area Level |
!colspan="1"|Boss | !colspan="1"|Boss | ||
!colspan="1"|Layouts | !colspan="1"|Layouts | ||
| Line 123: | Line 121: | ||
Ursa Bloodthirst | Ursa Bloodthirst | ||
! style="vertical-align:top;text-align:left"| | ! style="vertical-align:top;text-align:left"| | ||
| − | [https:// | + | [[Media:T3_1.png | Layout 1]], |
| − | [https:// | + | [[Media:T3_2.png | Layout 2]] |
| + | |- | ||
| + | ! style="vertical-align:top;text-align:left"| | ||
| + | Forgotten Desert | ||
| + | ! style="vertical-align:top;text-align:left"| | ||
| + | 88 | ||
| + | ! style="vertical-align:top;text-align:left"| | ||
| + | Crazed Sorcerer | ||
| + | ! style="vertical-align:top;text-align:left"| | ||
| + | Layout 1: | ||
| + | [https://i.imgur.com/9uPexUe.png Composite minimap] | ||
| + | [https://i.imgur.com/x5JLBQt.png Outlined] | ||
| + | [https://i.imgur.com/rDlqwfx.png Overview] | ||
|- | |- | ||
! style="vertical-align:top;text-align:left"| | ! style="vertical-align:top;text-align:left"| | ||
| Line 136: | Line 146: | ||
|- | |- | ||
! style="vertical-align:top;text-align:left"| | ! style="vertical-align:top;text-align:left"| | ||
| − | + | Baleful Alcazar | |
! style="vertical-align:top;text-align:left"| | ! style="vertical-align:top;text-align:left"| | ||
88 | 88 | ||
| Line 142: | Line 152: | ||
Crazed Sorcerer | Crazed Sorcerer | ||
! style="vertical-align:top;text-align:left"| | ! style="vertical-align:top;text-align:left"| | ||
| − | + | N/a | |
| − | + | |- | |
| − | |||
| − | |||
|} | |} | ||
| − | + | '''Pleasant Pasture''' | |
| + | |||
| + | This relic can only be made by corrupting a relic. | ||
| + | |||
{| class="wikitable" | {| class="wikitable" | ||
|- | |- | ||
!colspan="1"|Name | !colspan="1"|Name | ||
| − | !colspan="1"| | + | !colspan="1"|Area Level |
!colspan="1"|Boss | !colspan="1"|Boss | ||
!colspan="1"|Layouts | !colspan="1"|Layouts | ||
| Line 161: | Line 172: | ||
86 | 86 | ||
! style="vertical-align:top;text-align:left"| | ! style="vertical-align:top;text-align:left"| | ||
| − | + | - | |
! style="vertical-align:top;text-align:left"| | ! style="vertical-align:top;text-align:left"| | ||
N/a | N/a | ||
|- | |- | ||
|} | |} | ||
| − | |||
| − | + | == Relic Corruption == | |
| + | |||
| + | |||
| + | You can corrupt relics to give increased density and experience or reroll them. Almost all relics that drop are Rare items (yellow text name). Rarely, Magic (blue text name) relics also drop. | ||
| + | |||
| + | See [[Orb_of_Corruption|Orb of Corruption ]] for outcome probability. | ||
| + | |||
| + | |||
| + | === Relic Modification Recipes === | ||
| + | ---- | ||
| + | You can use the Horadric Cube to upgrade, corrupt and reroll a relic by transmuting (press twice) the following ingredients, | ||
| + | |||
| − | + | '''Upgraded''' Relic: | |
| − | + | 4 White relics can be turned into a Yellow relic. | |
| − | + | 4 Yellow relics can be turned into a Red relic. | |
| + | |||
| − | |||
| − | + | '''Corrupted''' relic: | |
| − | ''' | + | An '''Orb of Corruption + relic'''. These have a chance to increase monster density and experience however usually add more challenging affixes. |
| − | |||
| − | '''Re-rolled''' | + | '''Re-rolled''' relic: |
| − | ''' | + | '''3 Perfect Skulls + Rare relic (yellow text name)''' for a new set of affixes. |
| − | |||
| + | '''3 Perfect Gems + Magic relic (blue text name)''' for a new affix or pair of affixes. (This is the same recipe as you would use to reroll a magic (blue) item). | ||
| − | + | (You can also reroll a corrupted relic). | |
| − | |||
| − | + | Corrupted relics have a small chance to turn into a Pleasant Pasture. <br /> | |
| − | + | Current closest estimate of rolling a cow relic is 3.4% (12 of 350). | |
| − | |||
| − | |||
| − | |||
| − | |||
| − | |||
| − | |||
| − | |||
| − | + | Winnisk57 corrupted 1,100 Relics, giving us insight into how Orbs of Corruption affect relics. | |
| − | |||
| − | === Icy Cavern | + | Relics appear to be affected in the same way as other items affected by Orbs of Corruption. |
| + | |||
| + | Below are; affix, % chance of roll and the +%Density and +%Experience: | ||
| + | ::Changed set of affixes, 48% (most likely should be 50%, 25% Corrupted item affix and 25% transformed into a Rare item) | ||
| + | ::Corruption no change, 25% - same as Corrupted No Change items, +25% Density and +1% Experience | ||
| + | ::-%Life, 7.75%, +~27% Density and +1% Experience | ||
| + | ::Gold and Magic Find, 8.375%, +50% Density and +4% Experience | ||
| + | ::Monsters do Magic damage, 7.5%, +423% Density and +11% Experience | ||
| + | ::Cowrelic: 3.375% | ||
| + | |||
| + | == Monster Resistances and Immunities == | ||
| + | For colour charts showing relic monster resistances and a calculator https://mmmpld.github.io/pod-map-calc/ | ||
| + | |||
| + | '''Icy Cavern''' | ||
{| class="wikitable" | {| class="wikitable" | ||
!colspan="2"| | !colspan="2"| | ||
| − | !colspan="6"| | + | !colspan="6"|% Resistance |
|- | |- | ||
| − | !Monster||Model|| | + | !Monster||Model||Physical||Fire||Cold||Lightning||Poison||Magic |
|- | |- | ||
| − | |Blood Lord||Blood Lord|| | + | |Blood Lord||Blood Lord||100||33||33||33||33||33 |
|- | |- | ||
| − | |Temple Guard||Baboon Demon||33||0||100||0 | + | |Temple Guard||Baboon Demon||33||0||33||100||0||0 |
|- | |- | ||
| − | |Unholy Corpse||Reanimated Horde||0||0||0|| | + | |Unholy Corpse||Reanimated Horde||50||0||0||0||120||50 |
|- | |- | ||
| − | |Demon Sprite||Demon Imp|| | + | |Demon Sprite||Demon Imp||0||120||33||25||0||25 |
|- | |- | ||
| − | |Bush Barb||Spike Fiend||50||0|| | + | |Bush Barb||Spike Fiend||50||0||50||0||0||0 |
|} | |} | ||
| − | + | '''Frigid Plateau''' | |
{| class="wikitable" | {| class="wikitable" | ||
!colspan="2"| | !colspan="2"| | ||
| − | !colspan="6"| | + | !colspan="6"|% Resistance |
|- | |- | ||
| − | !Monster||Model|| | + | !Monster||Model||Physical||Fire||Cold||Lightning||Poison||Magic |
|- | |- | ||
| − | |Unholy Corpse||Reanimated Horde||0||0||0|| | + | |Unholy Corpse||Reanimated Horde||50||0||0||0||120||50 |
|- | |- | ||
| − | |Horror Archer||Skeleton Archer|| | + | |Horror Archer||Skeleton Archer||33||66||66||66||140||10 |
|- | |- | ||
| − | |Doom Knight||Oblivion Knight|| | + | |Doom Knight||Oblivion Knight||33||140||25||25||50||0 |
|- | |- | ||
| − | |Oblivion Knight||Oblivion Knight|| | + | |Oblivion Knight||Oblivion Knight||33||60||150||60||75||25 |
|- | |- | ||
| − | |Blunderbore||Blunderbore||33||33||33||0 | + | |Blunderbore||Blunderbore||75||33||33||33||0||0 |
|- | |- | ||
| − | |Death Mauler||Death Mauler||50||50||100||0 | + | |Death Mauler||Death Mauler||33||50||50||100||0||0 |
|- | |- | ||
| − | |Fiend||Bat||33||33||100||0 | + | |Fiend||Bat||10||33||33||100||0||0 |
|- | |- | ||
| − | |Storm Caster||Finger Mage|| | + | |Storm Caster||Finger Mage||40||66||25||100||25||0 |
|- | |- | ||
| − | |Temple Guard||Baboon Demon||33||0||100||0 | + | |Temple Guard||Baboon Demon||33||0||33||100||0||0 |
|- | |- | ||
| − | |Zealot||Zakarum Zealot|| | + | |Zealot||Zakarum Zealot||10||25||33||100||50||20 |
|} | |} | ||
| − | + | '''Dim Cellar''' | |
{| class="wikitable" | {| class="wikitable" | ||
!colspan="2"| | !colspan="2"| | ||
| − | !colspan="6"| | + | !colspan="6"|% Resistance |
|- | |- | ||
| − | !Monster||Model|| | + | !Monster||Model||Physical||Fire||Cold||Lightning||Poison||Magic |
|- | |- | ||
| − | |Blunderbore||Blunderbore||33||33||33||0 | + | |Blunderbore||Blunderbore||75||33||33||33||0||0 |
|- | |- | ||
| − | |Spider Magnus||Giant Spider|| | + | |Spider Magnus||Giant Spider||50||120||0||0||65||0 |
|- | |- | ||
| − | |Death Mauler||Death Mauler||50||50||100||0 | + | |Death Mauler||Death Mauler||33||50||50||100||0||0 |
|- | |- | ||
| − | |Flesh Lancer||Corrupt Rogue Spearwoman|| | + | |Flesh Lancer||Corrupt Rogue Spearwoman||45||25||130||25||25||0 |
|- | |- | ||
| − | |The Banished||Vampire|| | + | |The Banished||Vampire||50||33||150||25||50||0 |
|- | |- | ||
| − | |Soul Killer||Fetish|| | + | |Soul Killer||Fetish||15||105||25||25||33||0 |
|- | |- | ||
| − | |Bush Barb||Spike Fiend||50||0|| | + | |Bush Barb||Spike Fiend||50||0||50||0||0||0 |
|- | |- | ||
| − | |Blood Wing||Giant Mosquito||0||0||33|| | + | |Blood Wing||Giant Mosquito||0||0||0||33||120||0 |
|} | |} | ||
| − | + | '''Musty Crypt''' | |
{| class="wikitable" | {| class="wikitable" | ||
!colspan="2"| | !colspan="2"| | ||
| − | !colspan="6"| | + | !colspan="6"|% Resistance |
|- | |- | ||
| − | !Monster||Model|| | + | !Monster||Model||Physical||Fire||Cold||Lightning||Poison||Magic |
|- | |- | ||
| − | |Blood Lord||Blood Lord|| | + | |Blood Lord||Blood Lord||100||33||33||33||33||33 |
|- | |- | ||
| − | |Temple Guard||Baboon Demon||33||0||100||0 | + | |Temple Guard||Baboon Demon||33||0||33||100||0||0 |
|- | |- | ||
| − | |Unholy Corpse||Reanimated Horde|| | + | |Unholy Corpse||Reanimated Horde||50||0||0||50||120||50 |
|- | |- | ||
| − | |Demon Sprite||Demon Imp|| | + | |Demon Sprite||Demon Imp||0||120||33||25||0||25 |
|- | |- | ||
| − | |Frozen Scorch||Frozen Horror|| | + | |Frozen Scorch||Frozen Horror||25||0||190||33||33||0 |
|- | |- | ||
| − | |Bone Scarab||Scarab Demon||0||0|| | + | |Bone Scarab||Scarab Demon||0||0||0||120||0||0 |
|- | |- | ||
| − | |Hell Whip||Overseer|| | + | |Hell Whip||Overseer||40||33||160||20||0||0 |
|- | |- | ||
| − | |Hell Spawn||Baal's Minion|| | + | |Hell Spawn||Baal's Minion||33||110||50||25||0||0 |
|- | |- | ||
| − | |Slinger||Slinger|| | + | |Slinger||Slinger||25||50||150||15||15||0 |
|- | |- | ||
| − | |Fiend||Bat Demon||33||33||100||0 | + | |Fiend||Bat Demon||10||33||33||100||0||0 |
|- | |- | ||
| − | |Fanatic Enslaved||Suicide Minion|| | + | |Fanatic Enslaved||Suicide Minion||25||60||130||15||15||0 |
|- | |- | ||
| − | |Flying Scimitar||Object|| | + | |Flying Scimitar||Object||25||100||0||100||0||0 |
|} | |} | ||
| − | + | '''Desecrated Temple''' | |
{| class="wikitable" | {| class="wikitable" | ||
!colspan="2"| | !colspan="2"| | ||
| − | !colspan="6"| | + | !colspan="6"|% Resistance |
|- | |- | ||
| − | !Monster||Model|| | + | !Monster||Model||Physical||Fire||Cold||Lightning||Poison||Magic |
|- | |- | ||
| − | |Doom Knight||Oblivion Knight|| | + | |Doom Knight||Oblivion Knight||33||140||25||25||50||0 |
|- | |- | ||
| − | |Oblivion Knight||Oblivion Knight|| | + | |Oblivion Knight||Oblivion Knight||33||60||150||60||75||25 |
|- | |- | ||
| − | |The Banished||Vampire|| | + | |The Banished||Vampire||50||33||150||25||50||0 |
|- | |- | ||
| − | |Frozen Scorch||Frozen Horror|| | + | |Frozen Scorch||Frozen Horror||25||0||190||33||33||0 |
|- | |- | ||
| − | |Blunderbore||Blunderbore||33||33||33||0 | + | |Blunderbore||Blunderbore||75||33||33||33||0||0 |
|- | |- | ||
| − | |Blood Wing||Giant Mosquito||0||0||33|| | + | |Blood Wing||Giant Mosquito||0||0||0||33||120||0 |
|- | |- | ||
| − | |Spider Magnus||Gaint Spider|| | + | |Spider Magnus||Gaint Spider||50||120||0||0||65||0 |
|- | |- | ||
| − | |Death Clan||Goatman|| | + | |Death Clan||Goatman||50||75||0||0||0||50 |
|- | |- | ||
| − | |Storm Caster||Finger Mage|| | + | |Storm Caster||Finger Mage||40||66||25||100||25||0 |
|- | |- | ||
| − | |Demon Sprite||Demon Imp|| | + | |Demon Sprite||Demon Imp||0||120||33||25||0||25 |
|- | |- | ||
| − | |Bush Barb||Spike Fiend||50||0|| | + | |Bush Barb||Spike Fiend||50||0||50||0||0||0 |
|} | |} | ||
| − | + | '''Decomposing Settlement''' | |
{| class="wikitable" | {| class="wikitable" | ||
!colspan="2"| | !colspan="2"| | ||
| − | !colspan="6"| | + | !colspan="6"|% Resistance |
|- | |- | ||
| − | !Monster||Model|| | + | !Monster||Model||Physical||Fire||Cold||Lightning||Poison||Magic |
|- | |- | ||
| − | | | + | |Horadrim Ancient||Greater Mummy||33||50||50||50||50||100 |
|- | |- | ||
| − | | | + | |Blunderbore||Blunderbore||75||33||33||33||0||0 |
|- | |- | ||
| − | |Serpent Magus||Claw Viper|| | + | |Serpent Magus||Claw Viper||40||33||120||0||60||70 |
|- | |- | ||
| − | | | + | |Spider Magus||Giant Spider||50||120||0||0||65||0 |
|- | |- | ||
| − | | | + | |Dark Shape||Wraith||100||0||80||0||75||50 |
|- | |- | ||
| − | | | + | |Temple Guard||Baboon Demon ||33||0||33||100||0||0 |
|- | |- | ||
| − | |Zealot||Zakarum Zealot|| | + | |Zealot||Zakarum Zealot||10||25||160||100||20||0 |
|- | |- | ||
| − | | | + | |Hierophant||Zakarum Priest||10||25||160||33||20||0 |
|- | |- | ||
| − | | | + | |Bush Barb||Spike Fiend||50||0||50||0||0||0 |
|- | |- | ||
| − | | | + | |Unholy Corpse||Reanimated Horde||50||0||0||0||120||50 |
| + | |- | ||
| + | |Blood Temptress||Succubus||25||60||50||50||120||0 | ||
|} | |} | ||
| − | + | '''Ruined Citadel''' | |
{| class="wikitable" | {| class="wikitable" | ||
!colspan="2"| | !colspan="2"| | ||
| − | !colspan="6"| | + | !colspan="6"|% Resistance |
|- | |- | ||
| − | !Monster||Model|| | + | !Monster||Model||Physical||Fire||Cold||Lightning||Poison||Magic |
|- | |- | ||
| − | | | + | |Flesh Lancer||Corrupt Rogue Spearwoman||45||25||130||25||25||0 |
|- | |- | ||
| − | | | + | |Blood Temptress||Succubus||25||60||50||50||120||0 |
|- | |- | ||
| − | | | + | |Serpent Magus||Claw Viper||40||33||120||0||60||70 |
|- | |- | ||
| − | | | + | |Bone Scarab||Scarab Demon||0||0||0||120||0||0 |
|- | |- | ||
| − | | | + | |Temple Guard||Baboon Demon||33||0||33||100||0||0 |
|- | |- | ||
| − | | | + | |Hierophant||Zakarum Priest||10||25||160||33||20||0 |
|- | |- | ||
| − | | | + | |Zealot||Zakarum Zealot||10||25||160||100||20||0 |
|- | |- | ||
| − | | | + | |Dark Shape||Wraith||100||0||80||0||75||50 |
|- | |- | ||
| − | | | + | |Slinger||Slinger||25||50||150||15||15||0 |
|- | |- | ||
| − | |Fire Tower||Fire Tower||85|| | + | |Cadaver||Mummy||50||0||33||33||110||0 |
| + | |} | ||
| + | |||
| + | '''Forgotten Desert''' | ||
| + | {| class="wikitable" | ||
| + | !colspan="2"| | ||
| + | !colspan="6"|% Resistance | ||
| + | |- | ||
| + | !Monster||Model||Physical||Fire||Cold||Lightning||Poison||Magic | ||
| + | |- | ||
| + | |Blood Wing||Giant Mosquito||0||0||0||33||120||0 | ||
| + | |- | ||
| + | |Unholy Corpse||Reanimated Horde||50||0||0||0||120||50 | ||
| + | |- | ||
| + | |Hell Whip||Overseer||40||33||160||20||0||0 | ||
| + | |- | ||
| + | |Hell Spawn||Baal's Minion||33||110||50||25||0||0 | ||
| + | |- | ||
| + | |Storm Caster||Finger Mage||40||66||25||100||25||0 | ||
| + | |- | ||
| + | |Council Member||Council Member||50||33||33||100||33||0 | ||
| + | |- | ||
| + | |Soul Killer||Fetish||15||105||25||25||33||0 | ||
| + | |- | ||
| + | |Burning Dead Mage||Skeleton Mage||33||130||50||0||110||0 | ||
| + | |- | ||
| + | |Blood Lord||Blood Lord||100||33||33||33||33||33 | ||
| + | |- | ||
| + | |Fire Tower||Fire Tower||40||99||85||50||1000||50 | ||
| + | |- | ||
| + | |Bush Barb||Spike Fiend||50||0||50||0||0||0 | ||
| + | |} | ||
| + | |||
| + | '''Burnt Forest''' | ||
| + | {| class="wikitable" | ||
| + | !colspan="2"| | ||
| + | !colspan="6"|% Resistance | ||
| + | |- | ||
| + | !Monster||Model||Physical||Fire||Cold||Lightning||Poison||Magic | ||
| + | |- | ||
| + | |Pit Lord||Mega Daemon||80||145||100||100||145||100 | ||
| + | |- | ||
| + | |Horror Archer||Skeleton Archer||33||66||66||66||140||10 | ||
| + | |- | ||
| + | |Temple Guard||Baboon Demon||33||0||33||100||0||0 | ||
| + | |- | ||
| + | |Mauler||Blunderbore||55||50||50||100||0||0 | ||
|- | |- | ||
| − | | | + | |Horror Mage||Skeleton Mage||33||0||0||115||33||0 |
| + | |- | ||
| + | |Black Rogue||Corrupt Rogue||20||33||140||33||20||20 | ||
| + | |- | ||
| + | |Horadrim Ancient||Greater Mummy||33||50||50||50||50||100 | ||
| + | |- | ||
| + | |Infidel||Sand Raider||25||5||110||0||33||0 | ||
| + | |- | ||
| + | |Damned||Tainted||0||0||0||120||25||0 | ||
|} | |} | ||
| − | + | '''Baleful Alcazar''' | |
{| class="wikitable" | {| class="wikitable" | ||
!colspan="2"| | !colspan="2"| | ||
| − | !colspan="6"| | + | !colspan="6"|% Resistance |
|- | |- | ||
| − | !Monster||Model|| | + | !Monster||Model||Physical||Fire||Cold||Lightning||Poison||Magic |
|- | |- | ||
| − | | | + | |Dark Archer||Skeleton Archer||33||66||66||66||140||10 |
|- | |- | ||
| − | | | + | |Hell Swarm||Swarm||100||0||0||70||0||0 |
|- | |- | ||
| − | | | + | |Carrion Bird||Vulture Demon||0||25||0||0||110||0 |
|- | |- | ||
| − | | | + | |Horadrim Ancient||Greater Mummy||33||50||50||50||50||100 |
|- | |- | ||
| − | | | + | |Doom Knight||Oblivion Knight||33||140||25||25||50||0 |
|- | |- | ||
| − | | | + | |Oblivion Knight||Oblivion Knight||33||60||150||60||75||25 |
|- | |- | ||
| − | | | + | |Demon Trickster||Demon Imp||0||115||25||25||0||0 |
|- | |- | ||
| − | | | + | |Wailing Beast||Wendigo||50||20||0||0||0||100 |
|- | |- | ||
| − | | | + | |Balrog||Megademon||50||110||50||75||75||0 |
|} | |} | ||
| − | + | '''Pleasant Pasture''' | |
{| class="wikitable" | {| class="wikitable" | ||
!colspan="2"| | !colspan="2"| | ||
| − | !colspan="6"| | + | !colspan="6"|% Resistance |
|- | |- | ||
| − | !Monster||Model|| | + | !Monster||Model||Physical||Fire||Cold||Lightning||Poison||Magic |
|- | |- | ||
| − | |Hell Bovine||Hell Bovine||50||50||50|| | + | |Hell Bovine||Hell Bovine||50||50||50||50||33||33 |
|} | |} | ||
| − | == | + | == Relic Affixes == |
| − | + | ||
| + | Key: | ||
| + | |||
| + | (W) White relic | ||
| + | |||
| + | (Y) Yellow relic | ||
| + | |||
| + | (R) Red relic | ||
| + | |||
Values aren't full range. | Values aren't full range. | ||
| − | |||
Ingame examples: | Ingame examples: | ||
---- | ---- | ||
| − | + | + | +0-100% Experience |
| − | + | + | +0-2750% Monster Density |
| + | |||
| + | |||
| + | Monsters have Replenish Life per Second (W)16.7 | ||
| + | Characters have Reduced Maximum Mana | ||
| − | + | Characters have Drain Life -X | |
Monsters have +0-100% Defense | Monsters have +0-100% Defense | ||
| − | Monsters have +1-162% Attack Rating | + | Monsters have +1-162% Attack Rating (W)20-40% |
| + | |||
| + | Characters have -10 Vitality | ||
| + | |||
| + | Characters have -10 Energy | ||
Monsters have +84% Enhanced Damage | Monsters have +84% Enhanced Damage | ||
| − | + | Attackers take 0- (R)97-119 Physical Damage | |
| + | |||
| + | Characters have Chance to Avoid projectiles while Standing or Attacking | ||
| − | + | Characters have Chance to Evade projectiles or Attacks while Running | |
| − | + | ||
| − | Monsters have | + | |
| + | (Y) Monsters have 15% Chance to Cast level 25 Desecrate when Struck | ||
| − | Monsters have | + | (Y) Monsters have 15% Chance to Cast level <20 Meteor on death |
| − | ( | + | (Y) Monsters have 15% Chance to Cast level 20 Firewall when Struck |
| − | ( | + | (R) Monsters have 15% Chance to Cast level 25 Freeze Explosion on death |
| Line 473: | Line 571: | ||
| − | ( | + | Monsters have (R) Chance to Cast level 13 Weaken on Hit |
| + | |||
| − | ( | + | Monsters have (W) 10% Chance to Cast level 5 Amplify Damage on Hit |
| − | ( | + | Monsters have (Y) 20% Chance to Cast level 8 Amplify Damage on Hit |
| + | Monsters have (R) 30% Chance to Cast level 13 Amplify Damage on Hit | ||
| − | |||
| − | ( | + | Monsters have (W) 10% Chance to Cast level 1 Lower Resist on Hit |
| − | ( | + | Monsters have (Y) 20% Chance to Cast level 8 Lower Resist on Hit |
| + | Monsters have (R) 30% Chance to Cast level 13 Lower Resist on Hit | ||
| − | |||
| − | ( | + | Monsters have (Y) 20% Chance to Cast level 8 Decrepify on Hit |
| − | ( | + | Monsters have (R) 30% Chance to Cast level 13 Decrepify on Hit |
| − | Monsters have 0- | + | Monsters have Reduced Curse Duration: (Y)45-65% (R)75-100% |
| + | |||
| + | |||
| + | Monsters have 0-50% Physical Damage Resistance | ||
| + | |||
| + | Monsters have Physical Absorb % (W)15-25% | ||
Monsters have 0-278% Fire Resistance | Monsters have 0-278% Fire Resistance | ||
| + | |||
| + | Monsters have Fire Absorb (Y)20-40% (R)50-59% | ||
| + | |||
Monsters have +40-232% Cold Resistance | Monsters have +40-232% Cold Resistance | ||
| + | |||
| + | Monsters have Cold Absorb % | ||
| + | |||
Monsters have +200-339% Lightning Resistance | Monsters have +200-339% Lightning Resistance | ||
| − | Monsters have 0- | + | Monsters have Lightning Absorb % |
| + | |||
| + | |||
| + | Monsters have 0-277% Poison Resistance | ||
| + | |||
| + | Monsters have Poison Absorb 31% | ||
| + | |||
Monsters Physical and Magic Damage Reduced by 17-63 | Monsters Physical and Magic Damage Reduced by 17-63 | ||
| − | Monsters have | + | Monsters have Magic Absorb % |
| Line 513: | Line 629: | ||
| − | Monsters do + | + | Monsters do +99 - 199 minimum fire damage |
| − | Monsters do +0- | + | Monsters do +0-90% Fire damage (R)+55-90% |
| − | Monsters do | + | Monsters do +99 minimum cold damage |
| − | Monsters do +0- | + | Monsters do +0-88% Cold damage |
| − | Monsters do + | + | Monsters do +63 minimum lightning damage |
| − | Monsters do +0-183% Lightning | + | Monsters do +0-183% Lightning damage |
| − | Monsters do +0-90% Poison | + | Monsters do +0-90% Poison damage |
| Line 534: | Line 650: | ||
| − | Monsters | + | Monsters Can Not Be Frozen |
| + | |||
| + | |||
| + | Monsters do Bleed Damage per Second (R)+48.8 | ||
| + | |||
| + | Monsters have +100% Chance of Open Wounds | ||
| Line 542: | Line 663: | ||
| − | Monsters have level 12-20 Precision aura | + | Monsters have level 12-20 Precision aura (R)12-20 |
| − | Monsters have level 6-10 Blessed Aim aura | + | Monsters have level 6-10 Blessed Aim aura (R)9-10 |
Monsters have level 1-3 Vigor aura | Monsters have level 1-3 Vigor aura | ||
| − | Monsters have level 8-12 Cleansing aura | + | Monsters have level 8-12 Cleansing aura Level (W,Y,R)12 |
| + | |||
| + | Monsters have level 9-14 Redemption aura Level (Y)12 | ||
| + | |||
| + | Monsters have level 8-10 Concentration aura (R)8-10 | ||
| − | Monsters have | + | Monsters have (Y,R) Level 1 Salvation aura |
| − | Monsters have level 8-10 | + | Monsters have level 8-10 Conviction aura (R)9-10 |
| − | Monsters have | + | Monsters have (R) Fanaticism aura |
Monsters have 40-105% Faster Walk/Run speed | Monsters have 40-105% Faster Walk/Run speed | ||
| − | + | Monsters have Slow nearby enemies by 20% | |
| − | Monsters have 53- | + | Monsters have 53-130% Increased Attack Speed |
Latest revision as of 18:26, 1 April 2024
The following dungeon areas have been added/changed in Path of Diablo.
Contents
What is a Relic
A relic is an item that drops in Hell difficulty, which can be used to open a portal to a new area with challenging monsters. These relics can have affixes which makes the monsters stronger or the player weaker in exchange for an increase in XP earned.
Relics are consumed when the portal is opened. Once inside the area, players can mouse-over the relic icon on the hotbar to see the active affixes.
How to use a Relic
Characters must be level 80 and have completed the Rite of Passage quest in Act V.
In Harrogath, next to Malah, you will find an Altar that can be clicked. Place an identified Relic inside and click the button to consume the relic and open a portal.
Only one portal can be opened at a time. To open a second portal, simply create a new game.
Relics
Relics are grouped into difficulties based on the icon's colour.
Relic icons that are:
- white should be slightly challenging for a single player
- yellow should be a moderate challenge for a few players
- red should be a difficult challenge for a full party.
Relics may have a few variety of layouts or have the same static layout each time.
Relic orientation may be rotated compared to the layouts presented.
White Relics
| Name | Area Level | Boss | Layouts |
|---|---|---|---|
|
Icy Cavern |
86 |
Blood Huntress |
|
|
Frigid Plateau |
86 |
Blood Huntress |
Yellow Relics
| Name | Area Level | Boss | Layouts |
|---|---|---|---|
|
Desecrated Temple |
87 |
- |
N/a |
|
Dim Cellar |
87 |
Root of All Evil, also Blood Huntress sometimes |
N/a |
|
Musty Crypt |
87 |
- |
|
|
Decomposing Settlement |
87 |
Lord Balthazar |
N/a |
Red Relics
| Name | Area Level | Boss | Layouts |
|---|---|---|---|
|
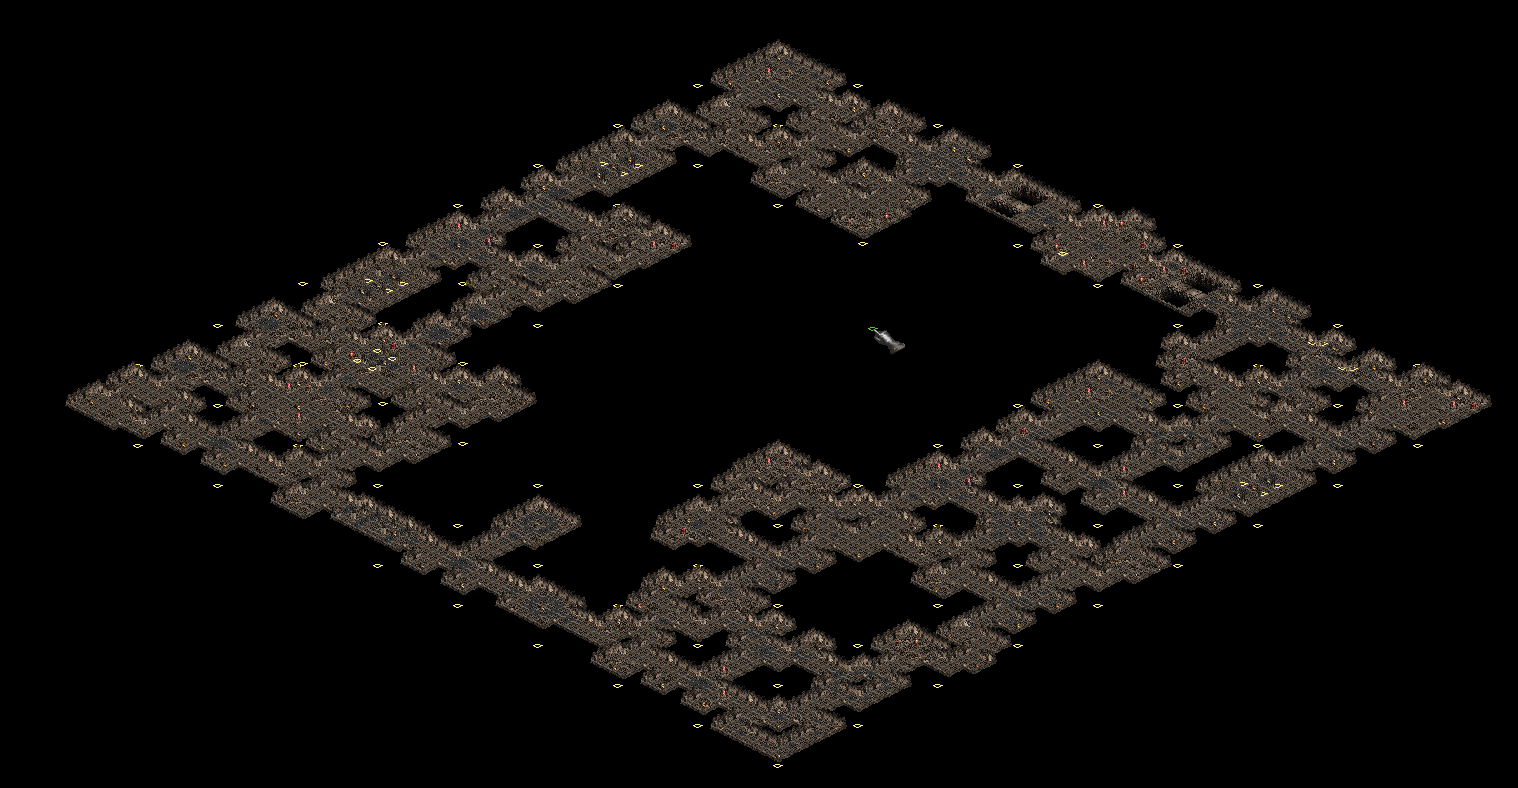
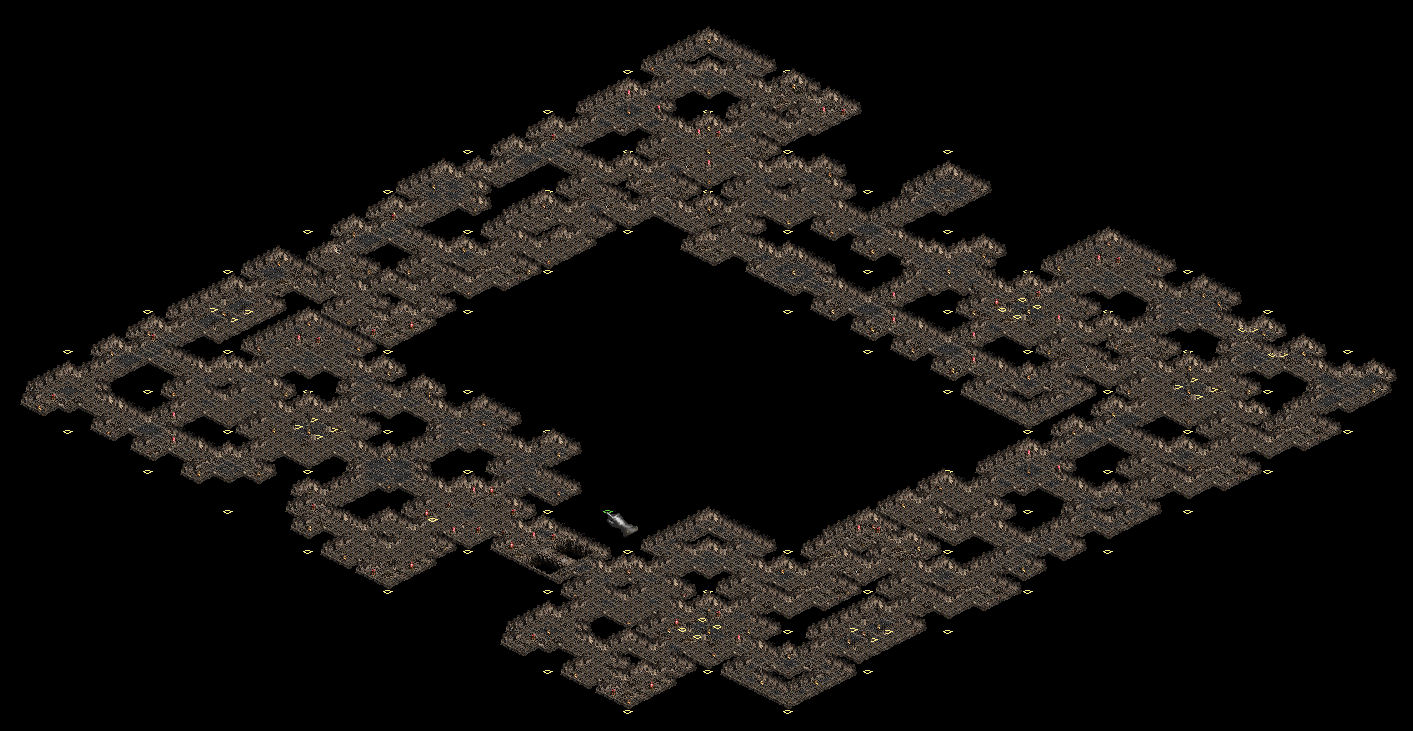
Ruined Citadel |
88 |
Ursa Bloodthirst |
|
|
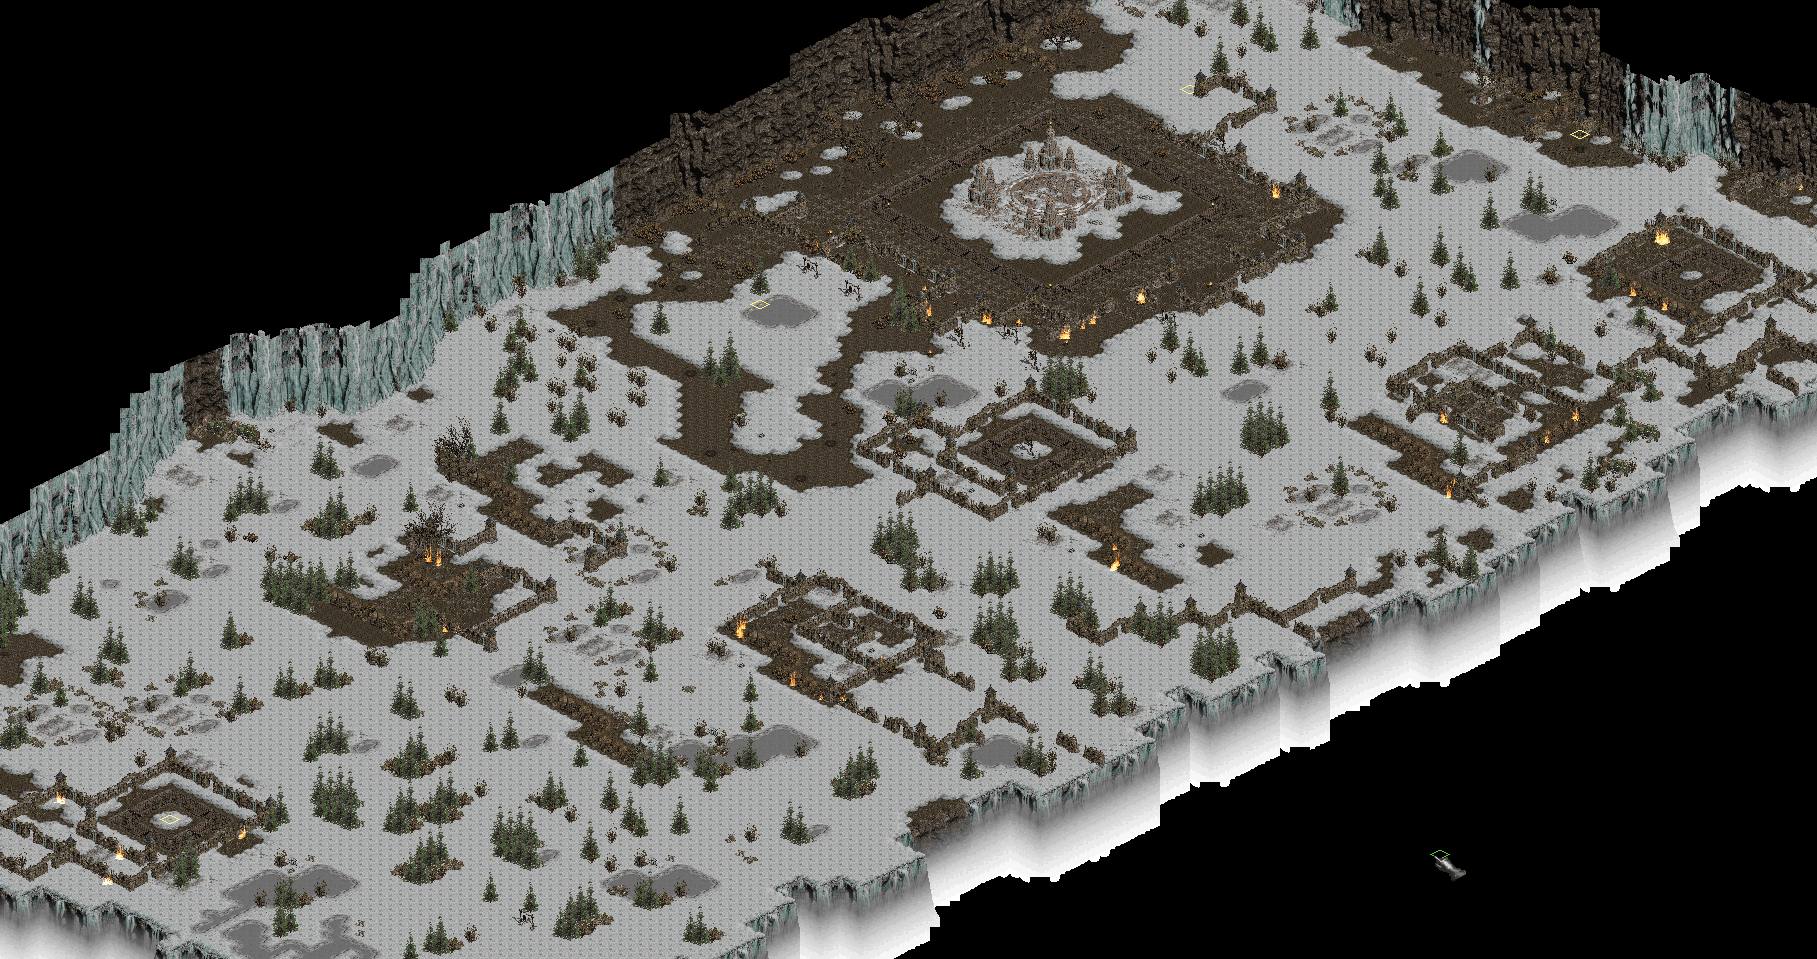
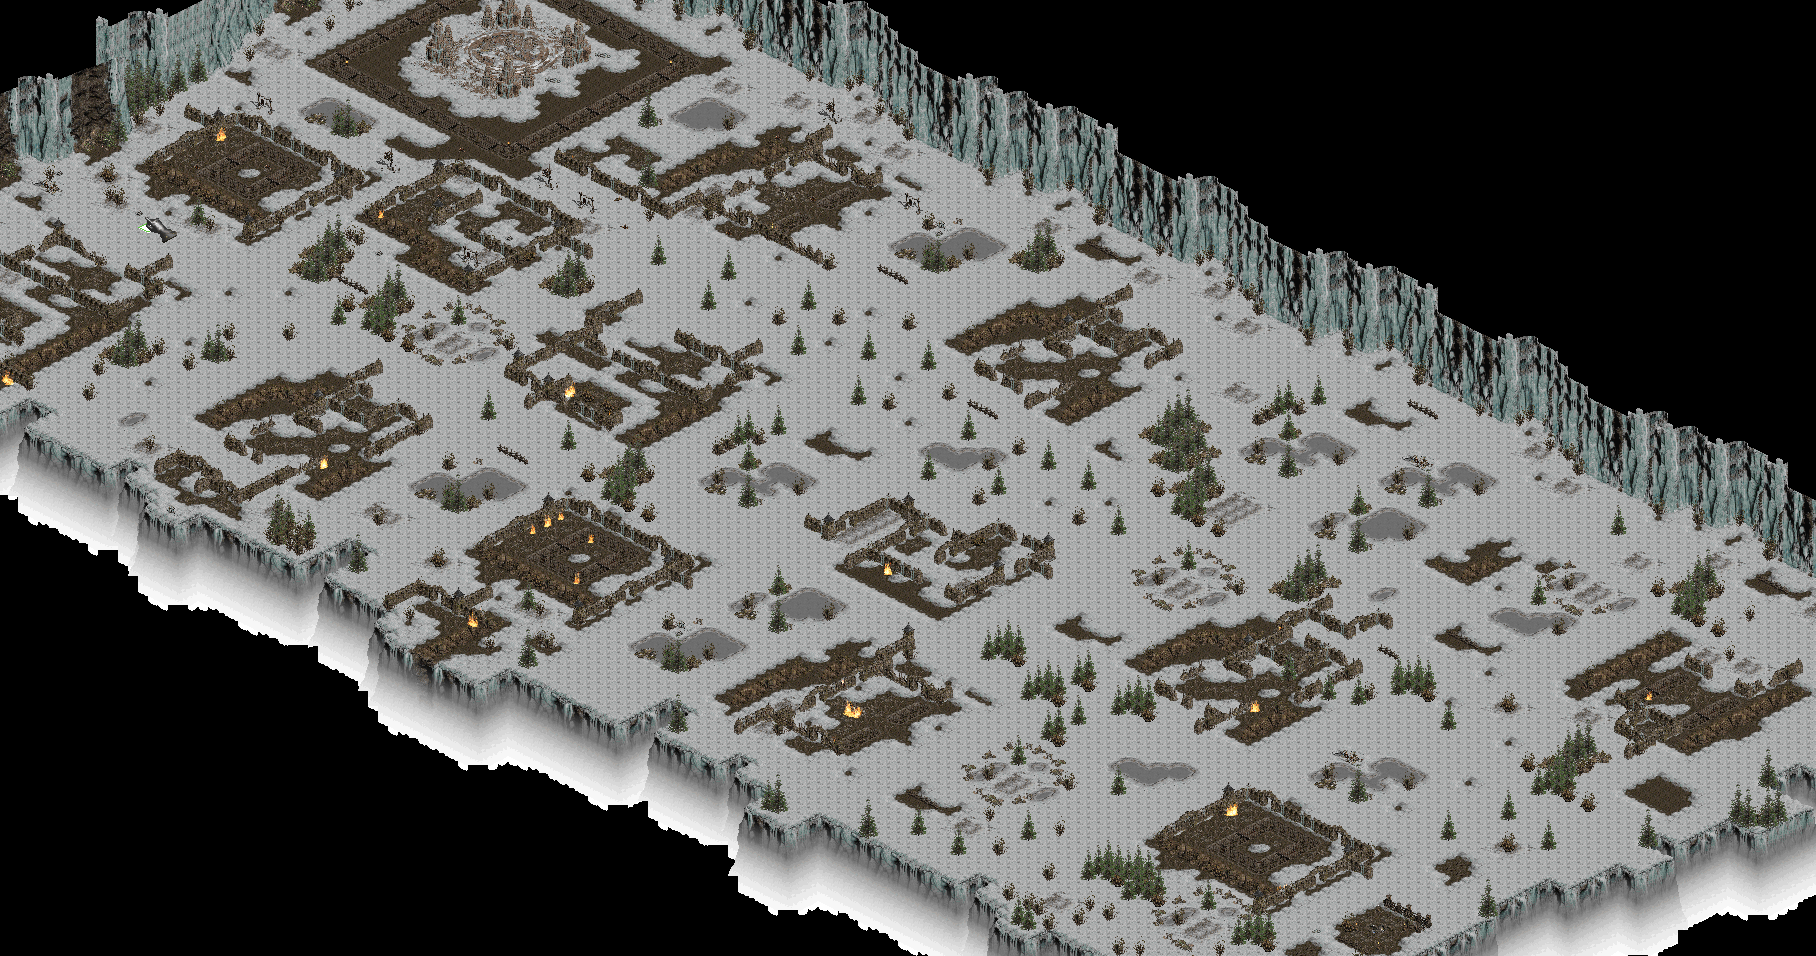
Forgotten Desert |
88 |
Crazed Sorcerer |
Layout 1: Composite minimap Outlined Overview |
|
Burnt Forest |
88 |
Crazed Sorcerer |
N/a |
|
Baleful Alcazar |
88 |
Crazed Sorcerer |
N/a |
Pleasant Pasture
This relic can only be made by corrupting a relic.
| Name | Area Level | Boss | Layouts |
|---|---|---|---|
|
Pleasant Pasture |
86 |
- |
N/a |
Relic Corruption
You can corrupt relics to give increased density and experience or reroll them. Almost all relics that drop are Rare items (yellow text name). Rarely, Magic (blue text name) relics also drop.
See Orb of Corruption for outcome probability.
Relic Modification Recipes
You can use the Horadric Cube to upgrade, corrupt and reroll a relic by transmuting (press twice) the following ingredients,
Upgraded Relic:
4 White relics can be turned into a Yellow relic.
4 Yellow relics can be turned into a Red relic.
Corrupted relic:
An Orb of Corruption + relic. These have a chance to increase monster density and experience however usually add more challenging affixes.
Re-rolled relic:
3 Perfect Skulls + Rare relic (yellow text name) for a new set of affixes.
3 Perfect Gems + Magic relic (blue text name) for a new affix or pair of affixes. (This is the same recipe as you would use to reroll a magic (blue) item).
(You can also reroll a corrupted relic).
Corrupted relics have a small chance to turn into a Pleasant Pasture.
Current closest estimate of rolling a cow relic is 3.4% (12 of 350).
Winnisk57 corrupted 1,100 Relics, giving us insight into how Orbs of Corruption affect relics.
Relics appear to be affected in the same way as other items affected by Orbs of Corruption.
Below are; affix, % chance of roll and the +%Density and +%Experience:
- Changed set of affixes, 48% (most likely should be 50%, 25% Corrupted item affix and 25% transformed into a Rare item)
- Corruption no change, 25% - same as Corrupted No Change items, +25% Density and +1% Experience
- -%Life, 7.75%, +~27% Density and +1% Experience
- Gold and Magic Find, 8.375%, +50% Density and +4% Experience
- Monsters do Magic damage, 7.5%, +423% Density and +11% Experience
- Cowrelic: 3.375%
Monster Resistances and Immunities
For colour charts showing relic monster resistances and a calculator https://mmmpld.github.io/pod-map-calc/
Icy Cavern
| % Resistance | |||||||
|---|---|---|---|---|---|---|---|
| Monster | Model | Physical | Fire | Cold | Lightning | Poison | Magic |
| Blood Lord | Blood Lord | 100 | 33 | 33 | 33 | 33 | 33 |
| Temple Guard | Baboon Demon | 33 | 0 | 33 | 100 | 0 | 0 |
| Unholy Corpse | Reanimated Horde | 50 | 0 | 0 | 0 | 120 | 50 |
| Demon Sprite | Demon Imp | 0 | 120 | 33 | 25 | 0 | 25 |
| Bush Barb | Spike Fiend | 50 | 0 | 50 | 0 | 0 | 0 |
Frigid Plateau
| % Resistance | |||||||
|---|---|---|---|---|---|---|---|
| Monster | Model | Physical | Fire | Cold | Lightning | Poison | Magic |
| Unholy Corpse | Reanimated Horde | 50 | 0 | 0 | 0 | 120 | 50 |
| Horror Archer | Skeleton Archer | 33 | 66 | 66 | 66 | 140 | 10 |
| Doom Knight | Oblivion Knight | 33 | 140 | 25 | 25 | 50 | 0 |
| Oblivion Knight | Oblivion Knight | 33 | 60 | 150 | 60 | 75 | 25 |
| Blunderbore | Blunderbore | 75 | 33 | 33 | 33 | 0 | 0 |
| Death Mauler | Death Mauler | 33 | 50 | 50 | 100 | 0 | 0 |
| Fiend | Bat | 10 | 33 | 33 | 100 | 0 | 0 |
| Storm Caster | Finger Mage | 40 | 66 | 25 | 100 | 25 | 0 |
| Temple Guard | Baboon Demon | 33 | 0 | 33 | 100 | 0 | 0 |
| Zealot | Zakarum Zealot | 10 | 25 | 33 | 100 | 50 | 20 |
Dim Cellar
| % Resistance | |||||||
|---|---|---|---|---|---|---|---|
| Monster | Model | Physical | Fire | Cold | Lightning | Poison | Magic |
| Blunderbore | Blunderbore | 75 | 33 | 33 | 33 | 0 | 0 |
| Spider Magnus | Giant Spider | 50 | 120 | 0 | 0 | 65 | 0 |
| Death Mauler | Death Mauler | 33 | 50 | 50 | 100 | 0 | 0 |
| Flesh Lancer | Corrupt Rogue Spearwoman | 45 | 25 | 130 | 25 | 25 | 0 |
| The Banished | Vampire | 50 | 33 | 150 | 25 | 50 | 0 |
| Soul Killer | Fetish | 15 | 105 | 25 | 25 | 33 | 0 |
| Bush Barb | Spike Fiend | 50 | 0 | 50 | 0 | 0 | 0 |
| Blood Wing | Giant Mosquito | 0 | 0 | 0 | 33 | 120 | 0 |
Musty Crypt
| % Resistance | |||||||
|---|---|---|---|---|---|---|---|
| Monster | Model | Physical | Fire | Cold | Lightning | Poison | Magic |
| Blood Lord | Blood Lord | 100 | 33 | 33 | 33 | 33 | 33 |
| Temple Guard | Baboon Demon | 33 | 0 | 33 | 100 | 0 | 0 |
| Unholy Corpse | Reanimated Horde | 50 | 0 | 0 | 50 | 120 | 50 |
| Demon Sprite | Demon Imp | 0 | 120 | 33 | 25 | 0 | 25 |
| Frozen Scorch | Frozen Horror | 25 | 0 | 190 | 33 | 33 | 0 |
| Bone Scarab | Scarab Demon | 0 | 0 | 0 | 120 | 0 | 0 |
| Hell Whip | Overseer | 40 | 33 | 160 | 20 | 0 | 0 |
| Hell Spawn | Baal's Minion | 33 | 110 | 50 | 25 | 0 | 0 |
| Slinger | Slinger | 25 | 50 | 150 | 15 | 15 | 0 |
| Fiend | Bat Demon | 10 | 33 | 33 | 100 | 0 | 0 |
| Fanatic Enslaved | Suicide Minion | 25 | 60 | 130 | 15 | 15 | 0 |
| Flying Scimitar | Object | 25 | 100 | 0 | 100 | 0 | 0 |
Desecrated Temple
| % Resistance | |||||||
|---|---|---|---|---|---|---|---|
| Monster | Model | Physical | Fire | Cold | Lightning | Poison | Magic |
| Doom Knight | Oblivion Knight | 33 | 140 | 25 | 25 | 50 | 0 |
| Oblivion Knight | Oblivion Knight | 33 | 60 | 150 | 60 | 75 | 25 |
| The Banished | Vampire | 50 | 33 | 150 | 25 | 50 | 0 |
| Frozen Scorch | Frozen Horror | 25 | 0 | 190 | 33 | 33 | 0 |
| Blunderbore | Blunderbore | 75 | 33 | 33 | 33 | 0 | 0 |
| Blood Wing | Giant Mosquito | 0 | 0 | 0 | 33 | 120 | 0 |
| Spider Magnus | Gaint Spider | 50 | 120 | 0 | 0 | 65 | 0 |
| Death Clan | Goatman | 50 | 75 | 0 | 0 | 0 | 50 |
| Storm Caster | Finger Mage | 40 | 66 | 25 | 100 | 25 | 0 |
| Demon Sprite | Demon Imp | 0 | 120 | 33 | 25 | 0 | 25 |
| Bush Barb | Spike Fiend | 50 | 0 | 50 | 0 | 0 | 0 |
Decomposing Settlement
| % Resistance | |||||||
|---|---|---|---|---|---|---|---|
| Monster | Model | Physical | Fire | Cold | Lightning | Poison | Magic |
| Horadrim Ancient | Greater Mummy | 33 | 50 | 50 | 50 | 50 | 100 |
| Blunderbore | Blunderbore | 75 | 33 | 33 | 33 | 0 | 0 |
| Serpent Magus | Claw Viper | 40 | 33 | 120 | 0 | 60 | 70 |
| Spider Magus | Giant Spider | 50 | 120 | 0 | 0 | 65 | 0 |
| Dark Shape | Wraith | 100 | 0 | 80 | 0 | 75 | 50 |
| Temple Guard | Baboon Demon | 33 | 0 | 33 | 100 | 0 | 0 |
| Zealot | Zakarum Zealot | 10 | 25 | 160 | 100 | 20 | 0 |
| Hierophant | Zakarum Priest | 10 | 25 | 160 | 33 | 20 | 0 |
| Bush Barb | Spike Fiend | 50 | 0 | 50 | 0 | 0 | 0 |
| Unholy Corpse | Reanimated Horde | 50 | 0 | 0 | 0 | 120 | 50 |
| Blood Temptress | Succubus | 25 | 60 | 50 | 50 | 120 | 0 |
Ruined Citadel
| % Resistance | |||||||
|---|---|---|---|---|---|---|---|
| Monster | Model | Physical | Fire | Cold | Lightning | Poison | Magic |
| Flesh Lancer | Corrupt Rogue Spearwoman | 45 | 25 | 130 | 25 | 25 | 0 |
| Blood Temptress | Succubus | 25 | 60 | 50 | 50 | 120 | 0 |
| Serpent Magus | Claw Viper | 40 | 33 | 120 | 0 | 60 | 70 |
| Bone Scarab | Scarab Demon | 0 | 0 | 0 | 120 | 0 | 0 |
| Temple Guard | Baboon Demon | 33 | 0 | 33 | 100 | 0 | 0 |
| Hierophant | Zakarum Priest | 10 | 25 | 160 | 33 | 20 | 0 |
| Zealot | Zakarum Zealot | 10 | 25 | 160 | 100 | 20 | 0 |
| Dark Shape | Wraith | 100 | 0 | 80 | 0 | 75 | 50 |
| Slinger | Slinger | 25 | 50 | 150 | 15 | 15 | 0 |
| Cadaver | Mummy | 50 | 0 | 33 | 33 | 110 | 0 |
Forgotten Desert
| % Resistance | |||||||
|---|---|---|---|---|---|---|---|
| Monster | Model | Physical | Fire | Cold | Lightning | Poison | Magic |
| Blood Wing | Giant Mosquito | 0 | 0 | 0 | 33 | 120 | 0 |
| Unholy Corpse | Reanimated Horde | 50 | 0 | 0 | 0 | 120 | 50 |
| Hell Whip | Overseer | 40 | 33 | 160 | 20 | 0 | 0 |
| Hell Spawn | Baal's Minion | 33 | 110 | 50 | 25 | 0 | 0 |
| Storm Caster | Finger Mage | 40 | 66 | 25 | 100 | 25 | 0 |
| Council Member | Council Member | 50 | 33 | 33 | 100 | 33 | 0 |
| Soul Killer | Fetish | 15 | 105 | 25 | 25 | 33 | 0 |
| Burning Dead Mage | Skeleton Mage | 33 | 130 | 50 | 0 | 110 | 0 |
| Blood Lord | Blood Lord | 100 | 33 | 33 | 33 | 33 | 33 |
| Fire Tower | Fire Tower | 40 | 99 | 85 | 50 | 1000 | 50 |
| Bush Barb | Spike Fiend | 50 | 0 | 50 | 0 | 0 | 0 |
Burnt Forest
| % Resistance | |||||||
|---|---|---|---|---|---|---|---|
| Monster | Model | Physical | Fire | Cold | Lightning | Poison | Magic |
| Pit Lord | Mega Daemon | 80 | 145 | 100 | 100 | 145 | 100 |
| Horror Archer | Skeleton Archer | 33 | 66 | 66 | 66 | 140 | 10 |
| Temple Guard | Baboon Demon | 33 | 0 | 33 | 100 | 0 | 0 |
| Mauler | Blunderbore | 55 | 50 | 50 | 100 | 0 | 0 |
| Horror Mage | Skeleton Mage | 33 | 0 | 0 | 115 | 33 | 0 |
| Black Rogue | Corrupt Rogue | 20 | 33 | 140 | 33 | 20 | 20 |
| Horadrim Ancient | Greater Mummy | 33 | 50 | 50 | 50 | 50 | 100 |
| Infidel | Sand Raider | 25 | 5 | 110 | 0 | 33 | 0 |
| Damned | Tainted | 0 | 0 | 0 | 120 | 25 | 0 |
Baleful Alcazar
| % Resistance | |||||||
|---|---|---|---|---|---|---|---|
| Monster | Model | Physical | Fire | Cold | Lightning | Poison | Magic |
| Dark Archer | Skeleton Archer | 33 | 66 | 66 | 66 | 140 | 10 |
| Hell Swarm | Swarm | 100 | 0 | 0 | 70 | 0 | 0 |
| Carrion Bird | Vulture Demon | 0 | 25 | 0 | 0 | 110 | 0 |
| Horadrim Ancient | Greater Mummy | 33 | 50 | 50 | 50 | 50 | 100 |
| Doom Knight | Oblivion Knight | 33 | 140 | 25 | 25 | 50 | 0 |
| Oblivion Knight | Oblivion Knight | 33 | 60 | 150 | 60 | 75 | 25 |
| Demon Trickster | Demon Imp | 0 | 115 | 25 | 25 | 0 | 0 |
| Wailing Beast | Wendigo | 50 | 20 | 0 | 0 | 0 | 100 |
| Balrog | Megademon | 50 | 110 | 50 | 75 | 75 | 0 |
Pleasant Pasture
| % Resistance | |||||||
|---|---|---|---|---|---|---|---|
| Monster | Model | Physical | Fire | Cold | Lightning | Poison | Magic |
| Hell Bovine | Hell Bovine | 50 | 50 | 50 | 50 | 33 | 33 |
Relic Affixes
Key:
(W) White relic
(Y) Yellow relic
(R) Red relic
Values aren't full range.
Ingame examples:
+0-100% Experience
+0-2750% Monster Density
Monsters have Replenish Life per Second (W)16.7
Characters have Reduced Maximum Mana
Characters have Drain Life -X
Monsters have +0-100% Defense
Monsters have +1-162% Attack Rating (W)20-40%
Characters have -10 Vitality
Characters have -10 Energy
Monsters have +84% Enhanced Damage
Attackers take 0- (R)97-119 Physical Damage
Characters have Chance to Avoid projectiles while Standing or Attacking
Characters have Chance to Evade projectiles or Attacks while Running
(Y) Monsters have 15% Chance to Cast level 25 Desecrate when Struck
(Y) Monsters have 15% Chance to Cast level <20 Meteor on death
(Y) Monsters have 15% Chance to Cast level 20 Firewall when Struck
(R) Monsters have 15% Chance to Cast level 25 Freeze Explosion on death
Monsters have 0-50% Lifesteal
Monsters have (R) Chance to Cast level 13 Weaken on Hit
Monsters have (W) 10% Chance to Cast level 5 Amplify Damage on Hit
Monsters have (Y) 20% Chance to Cast level 8 Amplify Damage on Hit
Monsters have (R) 30% Chance to Cast level 13 Amplify Damage on Hit
Monsters have (W) 10% Chance to Cast level 1 Lower Resist on Hit
Monsters have (Y) 20% Chance to Cast level 8 Lower Resist on Hit
Monsters have (R) 30% Chance to Cast level 13 Lower Resist on Hit
Monsters have (Y) 20% Chance to Cast level 8 Decrepify on Hit
Monsters have (R) 30% Chance to Cast level 13 Decrepify on Hit
Monsters have Reduced Curse Duration: (Y)45-65% (R)75-100%
Monsters have 0-50% Physical Damage Resistance
Monsters have Physical Absorb % (W)15-25%
Monsters have 0-278% Fire Resistance
Monsters have Fire Absorb (Y)20-40% (R)50-59%
Monsters have +40-232% Cold Resistance
Monsters have Cold Absorb %
Monsters have +200-339% Lightning Resistance
Monsters have Lightning Absorb %
Monsters have 0-277% Poison Resistance
Monsters have Poison Absorb 31%
Monsters Physical and Magic Damage Reduced by 17-63
Monsters have Magic Absorb %
Monsters do +69-200 physical damage
Monsters do +99 - 199 minimum fire damage
Monsters do +0-90% Fire damage (R)+55-90%
Monsters do +99 minimum cold damage
Monsters do +0-88% Cold damage
Monsters do +63 minimum lightning damage
Monsters do +0-183% Lightning damage
Monsters do +0-90% Poison damage
Monsters do +0-199 Magic damage
Monsters Can Not Be Frozen
Monsters do Bleed Damage per Second (R)+48.8
Monsters have +100% Chance of Open Wounds
Monsters have 0-44% Deadly Strike
Monsters have 0-112% Piercing attack
Monsters have level 12-20 Precision aura (R)12-20
Monsters have level 6-10 Blessed Aim aura (R)9-10
Monsters have level 1-3 Vigor aura
Monsters have level 8-12 Cleansing aura Level (W,Y,R)12
Monsters have level 9-14 Redemption aura Level (Y)12
Monsters have level 8-10 Concentration aura (R)8-10
Monsters have (Y,R) Level 1 Salvation aura
Monsters have level 8-10 Conviction aura (R)9-10
Monsters have (R) Fanaticism aura
Monsters have 40-105% Faster Walk/Run speed
Monsters have Slow nearby enemies by 20%
Monsters have 53-130% Increased Attack Speed
+200% Gold and Magic Find
Character's Life reduced 29-88%